Starting seeds indoors is a great way to make your garden successful from the start. Nurturing and watching seedlings grow from nothing into a fully grown plant can be incredibly rewarding. Gardeners have asked how to be more successful with starting their own seeds, and the problems usually boil down to simple, common mistakes. Here are the three most common mistakes and how to fix them.
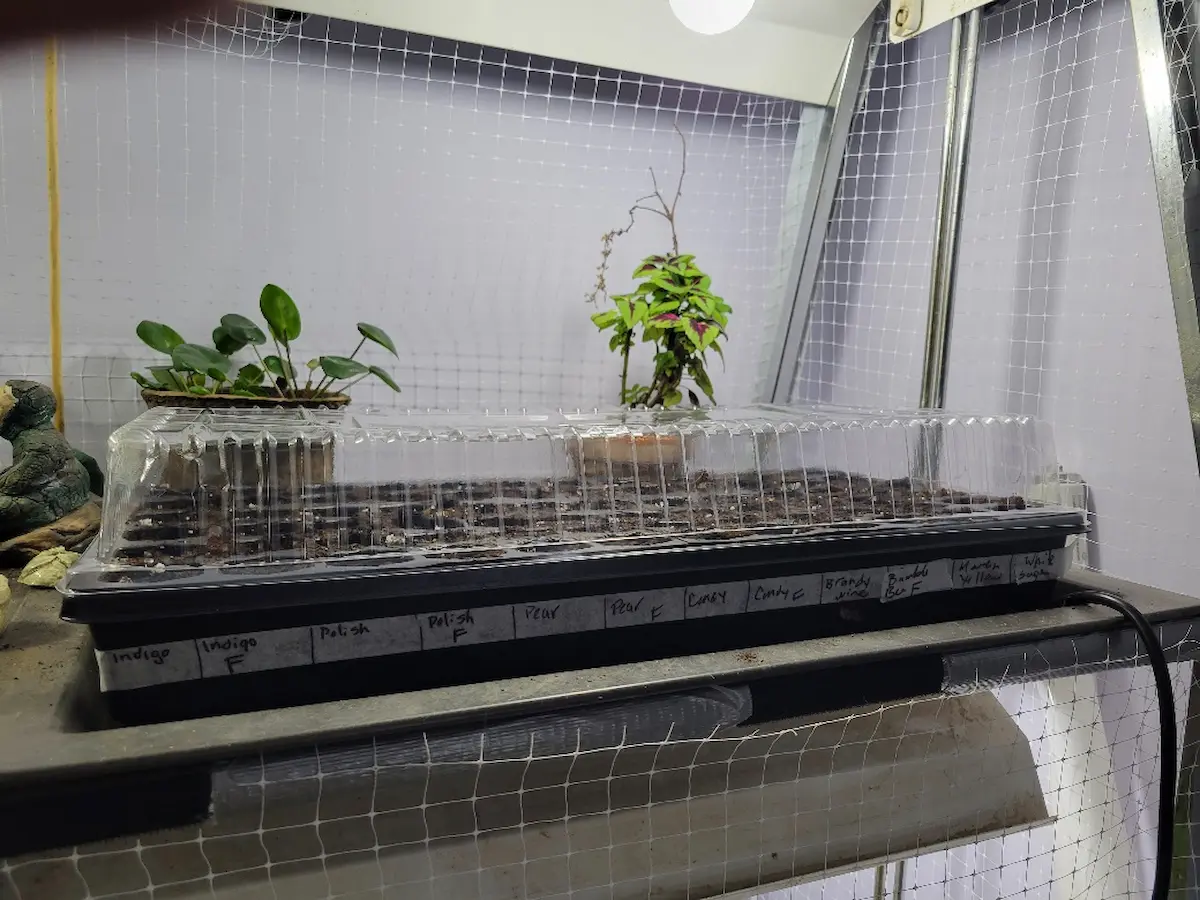
A common rookie mistake in starting seeds is not giving their seeds enough light. New seeds need a lot of light to get growing. You can start with a south-facing window, but if it doesn’t get 6+ hours a day, it probably won’t do.
Solution: artificial lights.
Using grow lights, found at your local garden center, can provide the ample amount of light your seedlings need. Hang lights from chains, so you can lower and raise them as they grow. Keep lights about 2–3 inches above the seedlings.
Too Much or Not Enough Water
This is the most challenging part about starting seeds. Seedlings are incredibly delicate and need to be watered just right. Keep the potting mix moist, but not wet.
Solution: Check seedlings regularly.
First, cover your seed-starting container with plastic until the seeds germinate. This will trap any moisture in and help keep the soil moist. Use a misting spray bottle until seedlings appear to avoid overwatering. Once your seedlings are established, water from the bottom. Your container should have drainage holes, so let your plants soak up the water from the holes to minimize the risk of overwatering. Lastly, check your plants every day.
Starting Too Soon
Many beginners try to start seeds as soon as they buy them, instead of when the package advises. We all get a little excited to have green plants growing again, but if started too soon, they can die off from the cold.
Solution: Find out when your expected last frost is.
Seeds should usually be started four to six weeks before your last frost date. This will ensure that by the time your seedlings are ready to be transplanted, your soil will have started to warm up. You may need to place your seedlings outside during the day and bring them in at night for a few days to get them acclimated to the outside temperatures.
In a few short weeks you’ll be ready to transplant!
Join me in my attempt to start tomato seeds & experience the challenges that come along the way. From choosing which ones to save to taking over the chicken coop, and finally, watching the seedlings sprout!
Plant peppers and make terracotta pot wreaths this winter while enjoying the warmth of the woodstove in your garden. You will get the benefit of pollinators going to your peppers and the joy of finished decoration for your outdoor space. A great way to spend your evening!
Learn easy tips for harvesting calendula seeds, the different colors you could find, the benefits of growing them in your own garden, and how to save the seeds for the next year. With calendula, you can get a colorful, tasty, pollinator-friendly garden–even on a dark and stormy night. Start your garden now and enjoy beautiful tomatoes, too.
Learn about my experience growing fingerling potatoes in a cloth bag and the challenges I faced. Find out the benefits of regular pots for potato cultivation and the importance of proper watering.
GardeningCalendar.ca gets some funding from advertisers. If you click on links and advertisements at no cost to you, the site may receive a small commission that helps fund its operation.

Leave a Reply
You must be logged in to post a comment.